

Growing potatoes is a fun and rewarding experience.
Potatoes are a nutritious and versatile food that can be used in many different recipes.
They are also easy to grow and can be grown in a variety of climates and soil types.
Choosing the Right Seed Potatoes
The first step in growing potatoes is choosing the right seed potatoes.
Seed potatoes are the small, whole potatoes that are used to grow new potatoes.
When choosing seed potatoes, look for ones that are firm, smooth, and free from blemishes or sprouts. It is also important to choose potatoes that are disease-free.
Typically, one seed potato can produce multiple potatoes.
The number of potatoes produced by a single seed potato depends on several factors, including the size of the seed potato, the variety of potatoes, the growing conditions, and the care given to the plants.
Under optimal growing conditions, a single seed potato can produce anywhere from 4 to 12 or more potatoes.
However, factors such as disease, pests, or inadequate growing conditions may reduce the number of potatoes produced.
Additionally, some potato varieties are known to produce more potatoes than others.
Seed potatoes can be purchased at garden centers or online.
It is important to choose a variety of potatoes that is suited to your climate and soil type.
Early season potatoes:
These take the shortest time to mature, typically around 70-90 days. Examples include Red Norland, Norchip, and Yellow Finn.
Mid-season potatoes:
These take a bit longer, around 100 days to mature. Popular mid-season varieties include Yukon Gold, Kennebec, and Russet Nugget.
Late season potatoes:
These are the slowest to mature, taking 120-135 days on average. Some well-known late-season varieties are Russet Burbank, Idaho Russet, and Purple Majesty.
Season:
Cooler temperatures:
Potato plants prefer moderate temperatures around 60-70°F (15-21°C).
Cool weather in spring or fall can extend the growing cycle slightly.
Hot temperatures:
Excessive heat can stress the plants and shorten the growing cycle, although some heat-tolerant varieties may be less affected.
Some popular varieties of potatoes include Yukon Gold, Russet, and Red Potatoes.


Preparing the Soil
Potatoes grow best in loose, well-draining soil.
Potatoes thrive well and give the best yield in sandy loam to loam soil rich in organic matter and well drained.
In soils with a high pH (over 7.5) a deficiency may appear mainly in phosphorus, but also in other micronutrients.
The optimal conditions for root development and tuber formation are well-ventilated soils, with temperatures in the range of 15 to 20 degrees Celsius.
Before planting, prepare the soil by removing any rocks, weeds, or other debris.
You can also add compost or other organic matter to the soil to improve its fertility.
Potatoes prefer a slightly acidic soil with a pH between 5.0 and 6.0.
You can test the pH of your soil with a soil testing kit, which can be purchased at a garden center or online.
If your soil is too acidic, you can add lime to raise the pH.
Planting the Seed Potatoes
Potatoes should be planted in the spring, about two to three weeks before the last frost date.
To plant, dig a shallow trench about 4 inches deep.
Place the seed potatoes in the trench about 12 inches apart, with the eyes facing up.
Cover the potatoes with soil, leaving a small mound of soil over each potato.
As the plants grow, you can add more soil to the mound, which will encourage the plants to produce more tubers.
This process is known as hilling.
Watering and Fertilizing
Potatoes generally benefit from a balanced fertilizer with a slightly higher potassium content (the third number in the N-P-K ratio).
A fertilizer with an N-P-K ratio of 20-20-20 or similar is suitable for potatoes.

Timing:
Short days encourage tuber formation, but long days inhibit it.
Start fertilizing when you plant the potatoes and continue throughout the growing season.
Divide the fertilizer application into several stages.
- Pre-Planting:
Incorporate a well-balanced, organic fertilizer into the soil before planting.
This provides a good foundation of nutrients for the emerging potato plants.
A gardener who adds compost in a minimum amount of 4-5 cubic meters per acre before planting, or a combination of a minimum total compost of 3 cubic meters per acre, can complete a growing cycle with the addition of nitrogen fertilization only.


- Early Growth Stage:
When the potato plants are about 6-8 inches tall, side-dress with a balanced fertilizer.
Create a shallow trench or furrow alongside the row of plants and apply the fertilizer, then cover it with soil.
- Mid-Season:
Repeat the side-dressing process when the plants are about 12 inches tall or when they begin to flower. This additional application supports the developing tubers.

- Watering:
Water the plants thoroughly after applying fertilizer to help dissolve and distribute the nutrients into the soil.
- Avoid Excessive Nitrogen:
Potatoes are sensitive to excessive nitrogen, which can promote excessive foliage growth at the expense of tuber development.
Be cautious with high-nitrogen fertilizers.
- Organic Options:
If you prefer organic methods, consider using well-rotted compost, aged manure, or organic fertilizers. These provide a slow release of nutrients and contribute to overall soil health.

- Mulching:
Mulch around the potato plants to conserve moisture, suppress weeds, and regulate soil temperature. Mulching also helps reduce nutrient leaching.
Controlling Pests and Diseases
Potatoes are susceptible to a number of pests and diseases, including potato beetles, blight, and scab. To control pests, you can handpick them off the plants or use an organic pesticide, such as neem oil or insecticidal soap.
To prevent diseases, practice good crop rotation by not planting potatoes in the same spot for at least three years.
You can also use disease-resistant varieties of potatoes and avoid planting in areas with poor drainage.
There are several common potato diseases that can affect potato plants and cause significant crop losses.
Here are some of the most typical potato diseases:
Late blight:

Late blight is one of the most devastating potato diseases.
It is caused by the fungus Phytophthora infestans and can cause rapid and extensive damage to the plants.
Symptoms of late blight include dark brown to black lesions on leaves, stems, and tubers.
The most well-known and influential disease in medicine. In the years 1846-1849 there was a great famine in Ireland caused by an outbreak of this disease which resulted in the destruction of crops,
The death of about a million people and the migration of two million people to North America.
Even today, though great progress in the development of fungicides, resistant varieties and systems for predicting the outbreak of the disease, it is considered still a serious disease since there are no effective means to completely neutralize it in an outbreak in the field.
actually preventing the disease It is the key to dealing with it.
The disease causes a great reduction in the crop, especially if the infection occurred in the first growing stages and also the quality of the tubers may be compromised.
Low-level or latently infected tubers may rot completely during storage.
As mentioned, in severe cases the disease can cause destruction absolute of the entire crop.
The symptoms of the disease: chlorotic and necrotic spots on the leaves, stems and petioles, surrounded by a gray halo of white mycelium bearing spores.
In high infestation and conditions that promote disease, especially high humidity, the foliage is destroyed within a few days.
The pathogen washed into the soil reaches the tubers and causes dry brown spots that develop very quickly into complete rot.

The infected plant tissues may also develop a musty odor.
Late blight can be managed through the use of fungicides.
Early blight:
Early blight is another fungal disease that can affect potato plants.
It is caused by the fungus Alternaria solani and typically appears on the lower leaves of the plant first. Symptoms of early blight include brown spots with concentric rings on leaves, and eventually, the leaves will turn yellow and fall off.
Early blight can be managed by pruning infected plant parts, and using fungicides.

Verticillium wilt:
Verticillium wilt is a soil-borne disease caused by the fungus Verticillium dahliae.
The fungus infects the roots of the potato plant and causes the leaves to wilt and turn yellow.
The fungus attacks Many plants, over 200 species, among them many agricultural crops that also include peanuts, Tomatoes, eggplants, melons, peppers, strawberries, olives, avocados, mangoes, nectarines, and also various wild plants.
It survives in soil and plant remains for many years even without a host through micro sclerotia
which form on the roots and root neck of the infected plant at the end of its growing period.
The infected plant may also have stunted growth, and the tubers may be small and misshapen.
Verticillium wilt can be managed through the use of resistant potato varieties, soil sanitization and good cultural practices such as crop rotation.

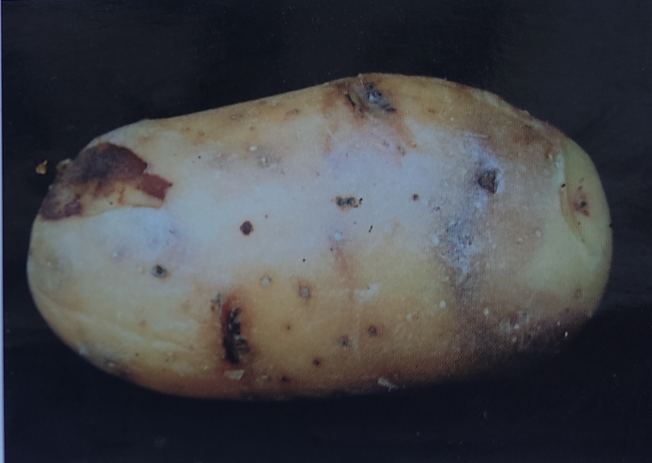
Common scab:
The common scab is a bacterial disease caused by the Streptomyces scabies bacterium.
It affects the skin of the potato tubers, causing them to develop rough, scabby patches.
Common scab is most prevalent in alkaline soils with a pH greater than 7.0.
To manage common scab, it is recommended to plant scab-resistant potato varieties, soil sanitization and avoid planting potatoes in alkaline soils.
Under high pH conditions, potatoes are susceptible to bacterial scab infection caused by Streptomyces scabies.
The bacteria are able to survive in the soil for over 12 years even without the presence of a host. Transmission and distribution is done mainly through potato seeds, and in addition also through cultivation tools, winds and sandstorms, irrigation water runoff, etc.

Blackleg:
Blackleg is a bacterial disease caused by Pectobacterium and Dickeya species.
The bacteria can infect the stem and tubers of the potato plant, causing soft rot, wilting, and plant death.
Blackleg can be managed by practicing good hygiene, soil sanitization, planting healthy seed potatoes, and avoiding planting in wet or poorly drained soils.
These are just a few of the typical potato diseases that can affect potato plants.
It is essential to monitor potato plants regularly and take action if any symptoms of disease are observed.
Preventive measures such as good cultural practices and the use of resistant potato varieties can also help prevent the spread of potato diseases.


Harvesting the Potatoes
Potatoes are ready to harvest when the plants start to die back and turn yellow.
This usually occurs about three to four months after planting.
To harvest, gently dig up the potatoes with a garden fork, being careful not to damage the tubers.
Let the potatoes dry in the sun for a few hours, then store them in a cool, dry place.
Storing the Potatoes
Potatoes should be stored in a cool, dark place with good ventilation.
Avoid storing potatoes in the refrigerator, as this can cause them to become sweet and mushy.
A pantry, root cellar, or garage can be good storage locations.
Before storing potatoes, check them for any damage or signs of rot.
Discard any potatoes that are damaged or diseased.
Tips for Success
Here are a few additional tips for growing potatoes successfully:
Start with healthy seed potatoes.
Avoid using potatoes that are sprouting or have signs of disease.
Don’t plant potatoes too early in the spring. Wait until the soil has warmed up and the risk of frost has passed.
Hill the plants regularly to encourage the production of more tubers.
Water consistently but avoid over-watering, as this can cause the potatoes to rot.
Practice good crop rotation to prevent the buildup of pests and diseases in the soil.
Store potatoes in a cool, dark place with good ventilation.
Nutrient deficiency symptoms in potatoes
Nitrogen
The leaves are pale green (general chlorosis).
The old leaves remain yellow, while young leaves take on a darker color.
The plants will produce fewer stems and tubers.
Phosphorus
Plant growth is inhibited.
Darker color than usual.
The underside of the leaf is grey-green.
In case of severe deficiency, the leaves curl upwards.
The phenomenon occurs in chalky and heavy soils.
Potassium
Potassium deficiency usually results in a charred appearance with black pigmentation and necrotic edges (dead tissue).
Symptoms appear on young, full-sized leaves.
The phenomenon is common in light soils.
Calcium
A mild calcium deficiency may not appear, but in severe situations the leaf margins may be damaged.
Brown spots may appear around the branch tip of the tuber.
Severe cracking of the tuber shell is possible.
The deficiencies are more severe in soils with a pH less than 5.
Magnesium
Leaf margin chlorosis in older leaves.
Yellowing symptoms appear first in the older leaves due to the mobility of the material.
General chlorosis, but the arteries remain green.
The burnt appearance is caused by necrosis between the veins of the leaf.
The phenomenon can occur in sandy soils and as a result of the application of high levels of potassium.
Sulfur
The symptoms are similar to those of nitrogen deficiency, but deficiency symptoms occur first in the young leaves (the yellowing is similar to that caused by nitrogen deficiency).
General chlorosis.
The yellowing is uniform.
You might also like these articles:
- Slow-Release Fertilizers for Trees and Shrubs

- A Plant’s Nutritional Needs: The Best Fertilizer for Each Stage of Plant Growth

- How to Use Roundup Effectively and Safely

- Weed Control in Your Garden: Choosing and Using Herbicides Safely and Effectively

- Effective Herbicides for Common Weeds in Lawns and Gardens

- Starting Seedlings from Seeds: Read This First

- Unleash the Magic of Mulch: Transform Your Garden Today!

- Transform Your Soil into a Vibrant Garden Oasis with the Power of Soil Amendments

- 10 high rated tillers for small/medium yard reviews
- Top-Ranked small to medium-sized yard Lawn Mowers review
- Tips for Growing an Avocado Tree: Climate Factors, Soil Needs, Tree Varieties, and Planting Methods

- Exploring the Benefits of Annual Flowers: Adding Color, Variety, and Easy Care to Your Garden
